Sunday, September 6, 2015

Sewaholic Thurlow Fitting Adjustments

Ohai.

I usually get some questions about what adjustments I made so I thought I'd post some photos of my FBA* for the Sewaholic Thurlow shorts

(* FULL BOOTY ADJUSTMENT)


I'm not sure who might find this useful, since I don't know anyone else with quite the rear differential that I have (15" increase from waist to butt apex), although the very helpful Kathy of kathy-sews is a slimmer version.  I often find her pants adjustment details really helpful.  Maybe someone out there will find my adjustments helpful as well!

I did a standard muslin process to get the adjustments, and then altered in my final version a couple of times before calling them "good enough."  I have learned the hard way to transfer each alteration to my pattern BEFORE going on with any other sewing.  I have a couple of other pants made where the final fit alterations are lost because I skipped that part.

I struggle a lot with motivation when fitting - I have lots of despair, having to do things over & over again.  Ripping out seams, and the pin, baste, try on, tweak & finally sew together gets really old.  However, wearing ill-fitting pants is even more annoying.  If I struggle when sewing and want to just be done, I go try on some off the rack pants, have a good hard look at my booty in the mirror and give myself a serious talking too.  I try to channel my late father, whose mantra was "If you're going to do a half-assed job you might as well not do it at all."  (pun intended)


Wednesday, August 12, 2015

New Look 6187

I have been looking for a nice summer shirt to keep the sun off - something with long sleeves and decent neck coverage.  I saw a few nice examples of New Look 6187 on Pattern Review, and got myself a copy.  I'm half way through, and I like it!


My fabric is a cotton voile by Amy Butler


It's a nice pattern, and the first time I have tried a New Look pattern.  The instructions are nice - they remind me of 1930s instructions - a bunch of illustrations down the center, with text to the side.  I like that instead of the one direction followed by one illustration layout that most other modern patterns use.

Saturday, August 1, 2015

Sorbetto Alterations

A little Before & After on the Colette Patterns Sorbetto top, with alterations detailed below.

On the back, you can see that I added a center back seam in the gingham.  This is because I did not have enough fabric to cut a full back piece.  I took advantage of the seam to remove some of the excess fabric.  I still have a way to go here.  


 In both tops, I widened from the waist down.  In the gingham top, I also scooped the hemline on back and front.  I think it's more flattering to have a slight curve across the hip.

On the gingham top, I cut the armscye in a bit, and also raised the bust dart by 1"


Finally, I added to the back, and removed from the front shoulder seam - this is an effort to get it to stop falling to the back and riding up in front.

Tuesday, February 3, 2015

Can't stop making Lady Ska-Tees

One more Lady Skater as a shirt - a long-sleeved version using up some fabric leftovers.  I love the pop of cobalt ribbing!  This ribbing has one side solid, and the opposite ribbed, so it is not as stretchy  as it should be.  I think it would be better used on a double-knit as opposed to the cotton-rayon-spandex blend of this bodice.  It ended up ok, but it was a little harrowing to ease on the neckband.

Tuesday, September 30, 2014

Friday, August 1, 2014

Button Loop Closure

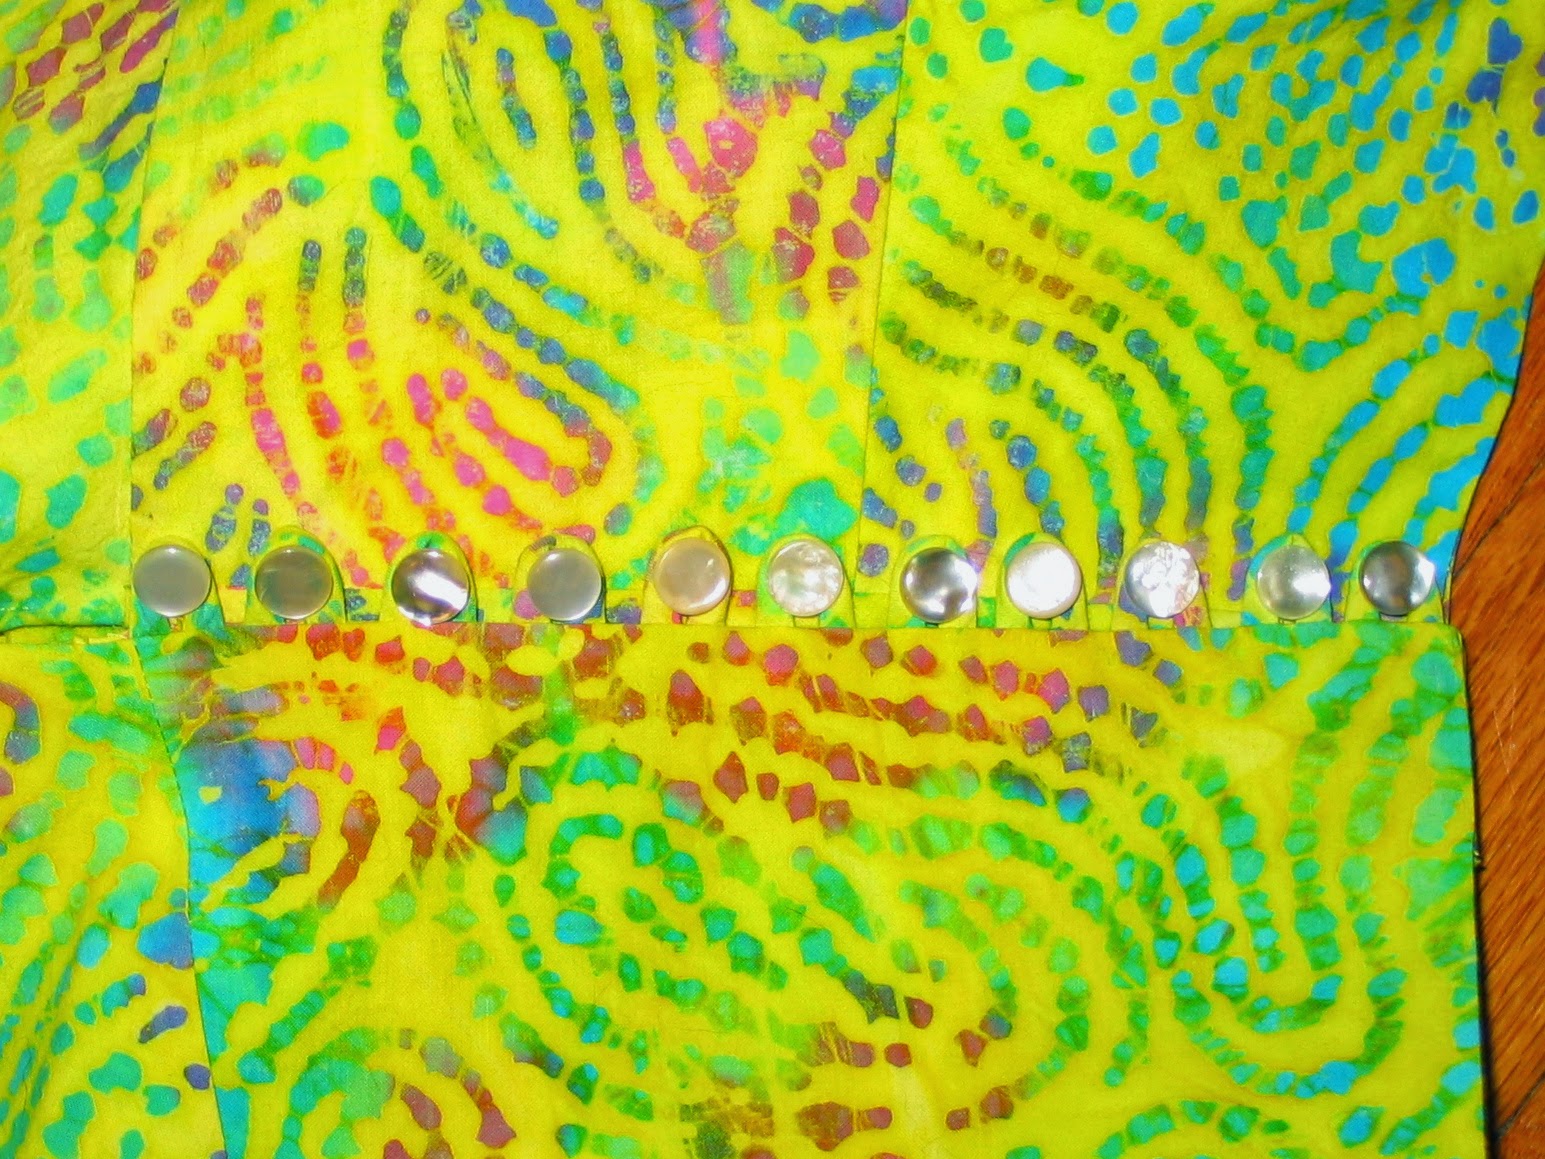
I decided to try to my first button loop closure on my wearable muslin of Simplicity 3823


I first cut 1" bias strips of my fashion fabric, stitched them at 3/8" from the edge & turned them.  They were still kinda flat as "self filled" tubing - so I cut some sock yarn, and threaded 2 strands through each tube to give it some body.

I then read 5 books about how to make button loop closures.  The best instructions were in my vintage 1961 "Singer Dressmaking Course" book - Here's a snap of the lovely illustrations!


I found some appropriate buttons, and measured my desired spacing on the garment.  I collected some double-stick tape and a piece of paper and started to place my loops.


I decided to simply put the loop into the seam allowance that was there for the zipper - this worked well.


On the opposite (button) side, I cut a 2" wide placket, and sewed that into the seam so that the underlap was wide enough to avoid my skin peeking through under the buttons.  I sewed a small snap to the corner at the top, so that it will be secure when wearing.


The loop closure is really very pretty & comfortable.  I'm glad I tried to learn something new instead of just installing another zipper.  


I still have to hem the peplum, and then take some final photos.

Thursday, July 24, 2014

WIP - halter top

I'm going to make Simplicity 3823 halter-top dress in this tropical-print Kaufmann cotton poplin.


I made a muslin in a batik cotton, and decided to line & alter it to be wearable.  I added some cotton batting to pad the cups.  I cut & nested a few ovals of decreasing size, stitched them to a backing.  I sandwiched them between the lining and outer layer, and basted to the lining side.  My lining is the same batik, and I did add the boning to the bodice back and side.  Finally, I added a small peplum below the waistband so that it is not a crop-top.

I still need to put in a closure, and hem the bottom.  The pattern calls for a lapped zipper, sewn in over the lining and outer fabric together.  This always seems so messy to me - why not try to nest the zipper inside the lining if you can?  I'm considering other closure options (perhaps a button band?)


I did a small bust adjustment by removing fabric from the back panels - sounds strange, but it worked well, and I have excellent coverage in the front.  Here is an image of where I marked the new seam-line:


I'm not really a Satinist


But what about the silk satin?

Wednesday, June 11, 2014

Sway Back

A while ago someone asked about how to remove length at the center back - for swayback alteration.  I'm making a new Lady Skater, and I altered the back bodice in this way.

Below is a photo showing what I did.  I use my curved ruler.  I mark at center back the height of the amount I want to remove (2/3") - then I place one edge on the side seam corner, and the other on my mark at center back and mark the new cutting line  For this pattern, I have created full-size pattern pieces - so next I flip the ruler and mark the same adjustment on the other side of the bodice.  I make sure to put the same ruler mark (3) at the center back when I flip it, so that the curve is the same on both sides.


Wednesday, May 21, 2014

Cambie!


I finally made myself a Sewaholic Cambie - and in the same fabric as the Tasia's version in her pattern store photos - which I didn't realize until after I made it up :)


I used a lightweight interfacing on the waistband, but it was too lightweight.  So, on the lining waistband I used sewn-in hair canvas.  I think this is ok - it looks very light on the exposed sheer swiss dot, and it holds a firm shape.  My only criticism is it's a bit scratchy, even through the lining.

I did not hem it as short as the pattern asked for - it's really already a smidge too short for me with the ~5/8" machine rolled hem that I did instead.

This dress takes a little time, because you assemble the lining and then sew the two together sandwiched around the invisible zip.  However, it is simple to sew - I made it up in about a week of evening sewing sessions.  I used my serger to assemble the skirt pieces, as hem for the lining, and to finish the center back seams before zipper application.  I used my sewing machine for everything else, as it's much more precise than the serger.


The exterior sewn and awaiting zipper attachment


Assembling the lining...

I can't say enough for her patterns for pear-shaped girls!  My only alteration was to do a swayback because... THIS is what it looked like before:

And after, with a little over 1" taken from the center tapered to nothing at the side seams:


A little close-up of the neckline, and pleated cap sleeves.  Because you have stay-stiched this in advance, the final attachment of the sleeves and also the attachment of the lining to bodice are a breeze, just sew along the dotted line!


Thursday, May 15, 2014

Mediocre, but functional sewing

Despite my New Year's resolution to sew all my clothing, I decided to purchase a couple pairs of jeans.  My reasoning was, that I don't really want to sew jeans and I'd rather sew what I want to sew than stick to a resolution on principle.

I buy OldNavy jeans, as they are inexpensive, and also come graded for 3 different shapes.  I buy the most pear-shaped jeans they offer - the SweetHeart.  These still fall off me due to a large waist, and you can see EVERYTHING if I don't have a shirt long enough to cover the rear.

I finally decided they were not wearable, and I had to alter them.
Terror ensued.
I have never sewn jeans, or a flat-felled seam.

This morning, I ripped out the seams, and cut a chunk off the center back, and out of the waistband.  I took the waist in by a little over 3" tapering quickly to nothing.  I don't think I'm putting the center carrier back on - I don't wear belts.

It's pretty clear what's my topstitching, and what's from the factory when you look here:

It's not PRETTY, but they fit much better.  Also anyone standing next to me can no longer see my underpants. 


Tuesday, May 13, 2014

Lady Skater III

Another Lady Skater made.


Additional alterations this time were to size down on side seams.  Next time I'll do a sway-back, and also add to the length of the back skirt panel.  I also want to try cutting one size smaller, instead of just taking it off the sides.

Monday, April 28, 2014

WIP - Summer Nightie

I've had this extraordinarily lovely fabric for some time.  Here is my WIP.

It's a cotton voile - and rather sheer.  I was considering making a lined dress with it, but I rarely wear white, and I stay away from wearing large prints in public as they just make me look larger than I already am.  At home though, I have no qualms about sporting some loud big prints.


I need a new summer nightgown - and this seemed to fit the bill.  At first I was thinking of making Butterick 6838 - but the reviewers were against it on sewing.patternreview.com - so instead I bought Simplicity 9012 on Etsy.

I decided to use the rayon seam binding tape Hug Snug for trim, as well as some cotton lace.  I had doubts about the hug snug at first, but I think a little solid dark color in the trim makes it look nicer.  I'm making french seams for this delicate fabric.

Last night, while assembling the yoke I sewed through my left index fingertip.  The needle went through the side by my nail, and I jerked back my hand which probably caused most of the damage.  When I got home from a trip to CVS for bandages, it was still in the down position.  Thank goodness I was using microtex - hahaha - very sharp and small.  I probably won't be able to finish the nightgown for another week or so because my finger needs to heal :(


Saturday, April 5, 2014

Cardigan-Jacket-Top?

I just finished sewing (well, actually I didn't hem the bottom, so it's not really finished) McCall's 6844 - one of the 2013 "Patterns of the Year" as judged by sewing.patternreview.com


I wanted to make this in a pretty royal blue sweater-knit, but alas I did not have enough fabric because the damn wool shrunk (cold water wash still means shrinking).  So, I grabbed some ends from other recent projects and cut it out.  


I cut a 36, as I heard it runs large.  I also altered the arms to be 1"wider because I heard they run small.


I used my Lola sweatshirt fleece for the bodice and arms.  I didn't have quite enough to cut the full bodice back, so I cut it a little shorter.  Good thing, because it is exactly at my waist with the 3/4" taken off.  The peplum is in that fleecy-spandex-neoprene wannabe fabric that I used to make my yoga pants.  I left the fleecy side out for this one, and it's very soft and fuzzy.  Also, the peplum drapes better with the smooth side down.


Thursday, March 20, 2014

Blue Archer

I'm wearing my blue Grainline Archer shirt today, and thought I'd snap a couple of photos.


Someone needs to get out the sleeve board, and iron (laaaaazy days).  My top-stitching & turn of collar are really quite improved for me - I am impressed with this shirt's details.