Monday, September 30, 2013

Baby Steps

Grainline Studio

I've made a little progress on my flannel shirt.  Everything is cut out and interfaced with ProWeft supreme light (I will never use Pellon again after going to Fashion Sewing Supply interfacings - I will write a post some day on how Pellon has ruined my garments).

I've made the plackets and attached the pockets

The stitching on the pockets was a little mysterious, so I pulled out the trusty David Page Coffin book and of course, he has a very helpful image to show a few different pocket and top-stiching options.  I went with the little triangle reinforcement on the right.


I have threaded my machine with purple needle, and black bobbin, since I had a black bobbin in the machine already & I'm lazy.  This seemed like a good idea, except that it meant I needed to stitch both sides of my placket from the top.  I ended up missing part of an edge, and had to blind stitch it down by hand.  I think I'll wind a purple bobbin before I get to the collar and cuffs so I can do those correctly.

Sunday, September 22, 2013

Working with Plaid

Plaid fabrics offer a lot of fun variations for a button-down shirt - you can put pieces on the bias (pockets, cuffs, button placket and shoulder yoke) or even get a chevron effect on the bodice front, or by piecing the shoulder yoke.  

Plaids also can look like a home-ec disaster if you don't get the matching done correctly.  I thought I'd post a little how-to on working with plaids as I sew my Archer button-down.  There are a couple of simple tricks I've picked up that make the matching very simple, so I'll share those here as I make my Archer.

Today, I'm cutting out fabric and I need to prepare my pattern for my plaid.  There are two changes that I'll need to do to my pattern before I cut out any fabric.
  • Choose the pieces you want to cut on the bias, and alter their grain-lines by 45 degrees (new grain-lines marked in red below)
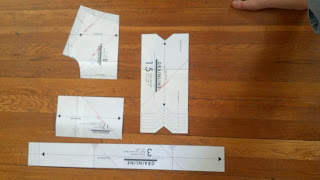
  • Find all pieces to be cut on-the-fold and make them full-sized.  You cannot cut plaid fabrics on the fold, for any pieces.  The plaid you can't see will not line up.  All pieces must be cut single.  Below are all the pieces from the Archer pattern that need alteration 


Using swedish tracing paper, I trace around the pattern, leaving 1/2" extra so I can tape them together. Be sure to transfer all markings. 
Then, cut it out, and tape it together 

Do this for all four pieces and you're ready to cut out your fabric.

For pieces that need in two mirror copies, like the sleeves or the front bodice, cut one from the fabric, and use that piece face-down as the pattern to cut out the second.  This lets you match the plaid all around.  It takes a little pulling & pushing to get the flannel to move around, but you can see my two bodice front pieces below

F#$k Finishing UFOs - Bring on the flannel!!

Maybe I can't bear looking at all these UFOs, but I'm sure as $#!T not going to finish one.  I haven't sewn in a month (excluding small alterations & mending).  I blame all this fuss about finishing what I started.  If I really wanted to sew those things - they'd be done by now.

Fall is here, and so is my Grainline Archer pattern.

I have a lovely plaid flannel I purchased last fall at "The Textile" in Greenfield, MA or "Eastern Textile" as we locals call it (was there ever a Western Textile?).

I've had great success with sewing plaid in the past as you can see below, so I am READY to go.

Yesterday I assembled the pdf pattern, cut it out in a size 12 grading to 14 in the hips.  I'm not making a muslin, because the 12 should be a little large, and I will lose my motivation if I cut out one more thing I'm not going to end up wearing.  If the shoulders are too tight, so be it!


Tuesday, September 10, 2013

UFO #2 Butterick 5824

Unfinished from last winter is Gertie's coat - Butterick 5824.  I have a bodice muslin that fits well after a few alterations.  The fabric is a discount wool houndstooth purchased at Sew Low Discount fabrics in Cambridge, Ma.  The poly charmeuse lining was also purchased there.


I want to interline the bodice for warmth, and purchased 2 yards of sew-in Pellon Thermolam.  I've read up on different techniques this here.  I plan to try the second technique, and baste the Thermolam inside the garment fabric after sewing it up.  For me, this is preferable to underlining because I do not want to add bulk to the seams.  I also didn't want to try quilting the Thermolam to the lining, because I don't like the look of a quilted lining on a formal coat.

I took the wool to my dry cleaner to steam, so that it would not shrink.  It was $25!!  I won't be doing that again any time soon.  My other woolens I have steamed with the iron at home, but with 7 yards of 60" wide fabric, I decided to spring for the dry cleaner.  I took it home, and patiently cut out 3/4 of the garment fabric, including adding tailor's tacks - but stopped when the weather started getting warm.

Now that it's fall once again, I'm tempted to start on this one.  I am terrified to attempt making a coat, but with the ease of kimono-sleeves this should be a good introductory garment. I'm familiar with basic linings and bound buttonholes from other projects.  The new-to-me techniques are the collar, and the interlining.   This UFO seems simpler than the jacket in my last post.